How to Repair All Windows Easily and For Free with Windows Repair AIO (All In One)
It’s been a while since I discovered the Windows Repair AIO (All In One) application, due to lack of time, I hadn’t taken the time to make a video. That is done .
Windows Repair is a software proposed by Tweaking.com. It is a real toolbox that, in a few clicks, allows you to repair your PC but not that. It also allows you to save your registry, have direct access to system restore and many other things.
This application works with all versions of Windows (Windows Vista, Windows 7, Windows 8 & 8.1, Windows 10)
A negative point (you need one), this application is only in English. Do not panic, we will resume in this article all possible manipulations, we will just follow the number.
Sommaire :
- 1 Install the application
- 2 Use of the application
- 2.1 Menu in the notification area
- 2.2 Pre-Repairs Steps
- 2.3 Backup Tools
- 2.4 Repairs – Main
- 2.5 List of 33 repairs
- 2.5.1 1 – Reset Registry Permissions
- 2.5.2 2 – Reset File Permissions
- 2.5.3 3 – Reset Service Permissions
- 2.5.4 4 – Register System Files
- 2.5.5 5 – Repair WMI
- 2.5.6 6 – Repair Windows Firewall
- 2.5.7 7 – Repair Internet Explorer
- 2.5.8 8 – Repair MDAC_MS Jet
- 2.5.9 9 – Repair Hosts File
- 2.5.10 10 – Remove Policies Set By Infections
- 2.5.11 11 – Repair Start Menu Icons Removed By Infections
- 2.5.12 12 – Repair Icons
- 2.5.13 13 – Repair Network
- 2.5.14 14 – Remove Temp Files
- 2.5.15 15 – Repair Proxy Settings
- 2.5.16 16 – Repair Windows Updates
- 2.5.17 17 – Repair CD_DVD Missing_Not Working
- 2.5.18 18 – Repair Volume Shadow Copy Service
- 2.5.19 19 – Repair Windows Sidebar_Gadgets
- 2.5.20 20 – Repair MSI Windows Installer
- 2.5.21 21 – Repair Windows Snipping Tool
- 2.5.22 22 – Repair File Associations
- 2.5.23 23 – Repair Windows Safe Mode
- 2.5.24 24 – Repair Print Spooler
- 2.5.25 25 – Restore Important Windows Services
- 2.5.26 26 – Set Windows Services To Default Startup
- 2.5.27 27.01 – Repair Windows 8_10 App Store
- 2.5.28 27.02 – Repair Windows 8_10 App Store Completely Reset App Store
- 2.5.29 28 – Repair Windows 8_10 Component Store
- 2.5.30 29 – Restore Windows 8_10 COM_Unmarshalers
- 2.5.31 30 – Repair Windows New Submenu
- 2.5.32 31 – Restore UAC Settings (Users Account Control)
- 2.5.33 32 – Repair Performance Counters
- 2.5.34 33 – Repair Recycle Bin
- 3 PRO version
Install the application
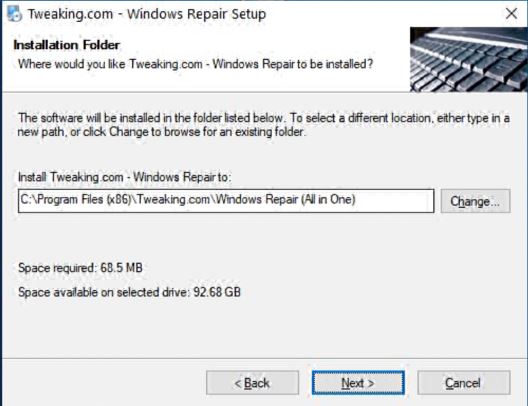
Once the application is downloaded, launch the installation, then click Next

In the next step, you can change the location of the installation, the installation is very light, it only weighs 70 MB.
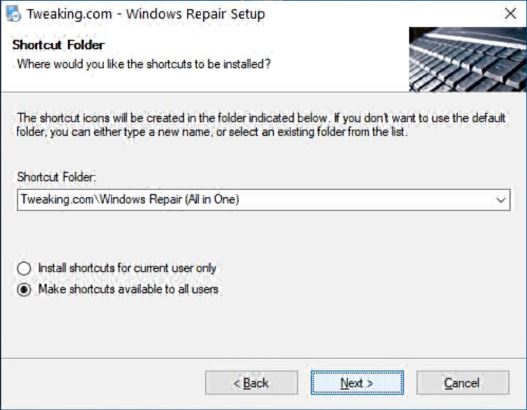
You can then choose whether shortcuts are for everyone or just for you.
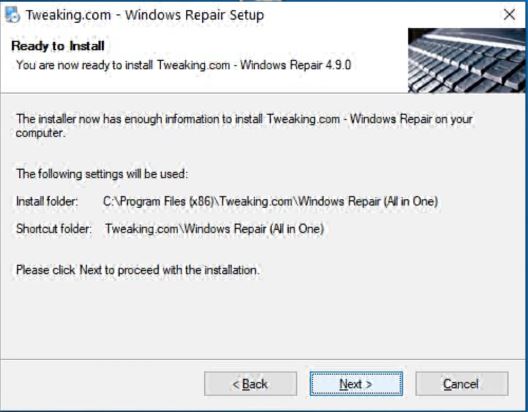
The application summarizes the different elements:
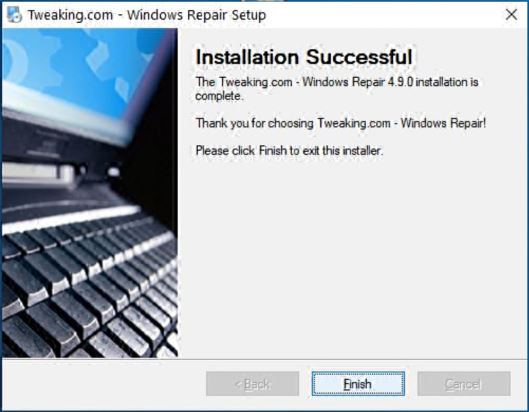
The installation is finished:
Use of the application
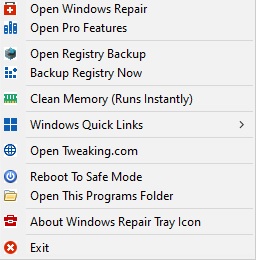
Menu in the notification area
An icon representing a red tool box appears in the notification area. A right click on it opens this menu:
- Open Windows Repair: Open the application
- Open Pro features: Open Advanced Tools
- Open Backup Registry: Opens the registry backup
- Backup Registry Now: Backup Registry Now
- Clean Memory: Clean Memory
- Windows Quick Links: Windows Quick Link
- Open Tweaking.com: Open tweaking.com
- Reboot To Safe Mode: restart in safe mode
- Open This Programs Folder: Open the program location.
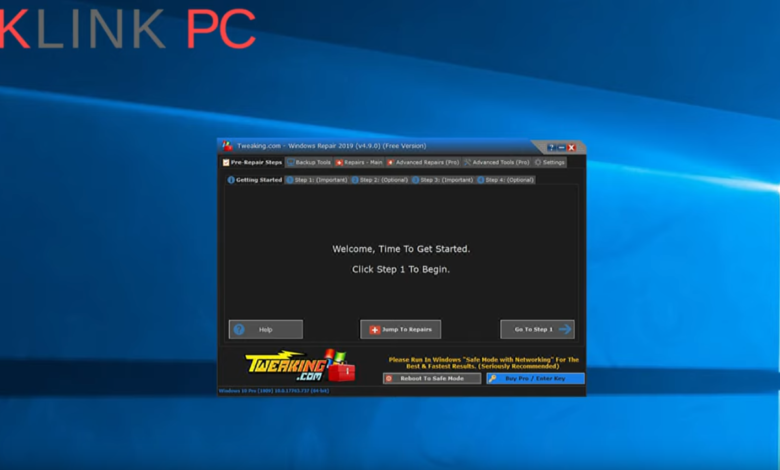
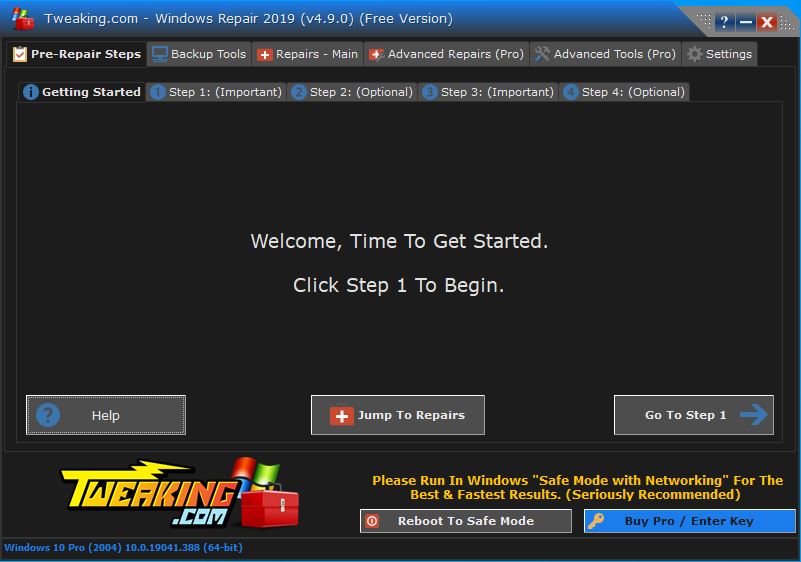
Pre-Repairs Steps
When we launch the application, we find ourselves on this page ‘Pre-repairs Steps’ and ‘Getting Started’:
- Help : Open Help in English
- Jump to Repairs : redirects you to the ‘Repairs – Main’ tab
- Go To Step 1 : redirects you to the Step 1 tab
- Reboot To Safe Mode : You can also restart in safe mode with a single click.
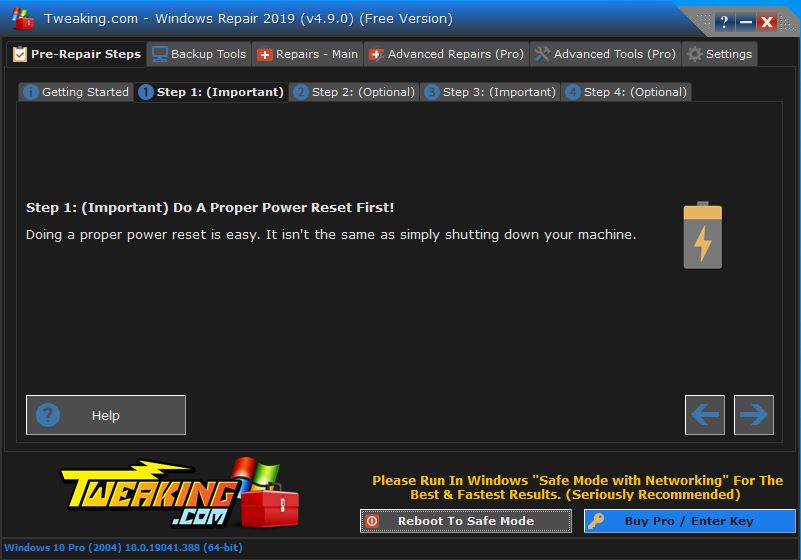
Tab: Step 1 (important)
Step 1 offers you to do a power reset (turn off and unplug your PC electrically) much like in this video.
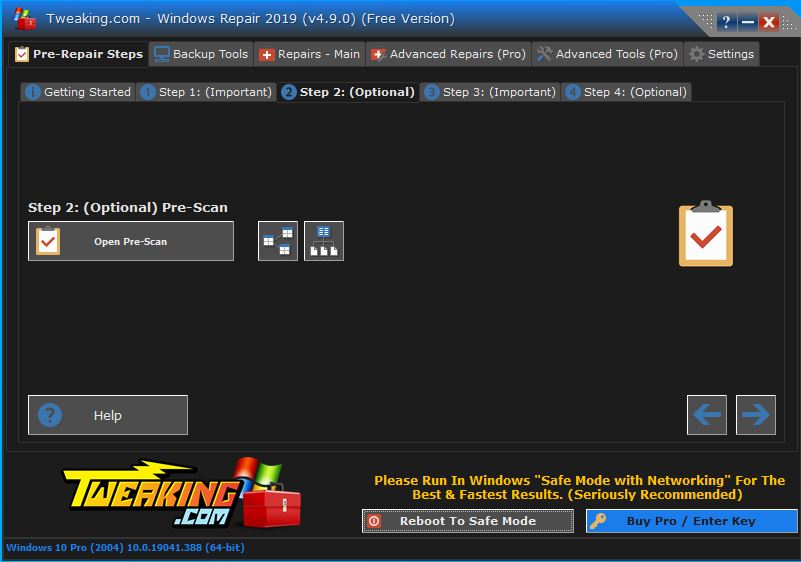
Tab: Step 2 (optional)
Step 2 allows you to perform a system scan to verify the integrity of the installation packages, the registry and other elements.
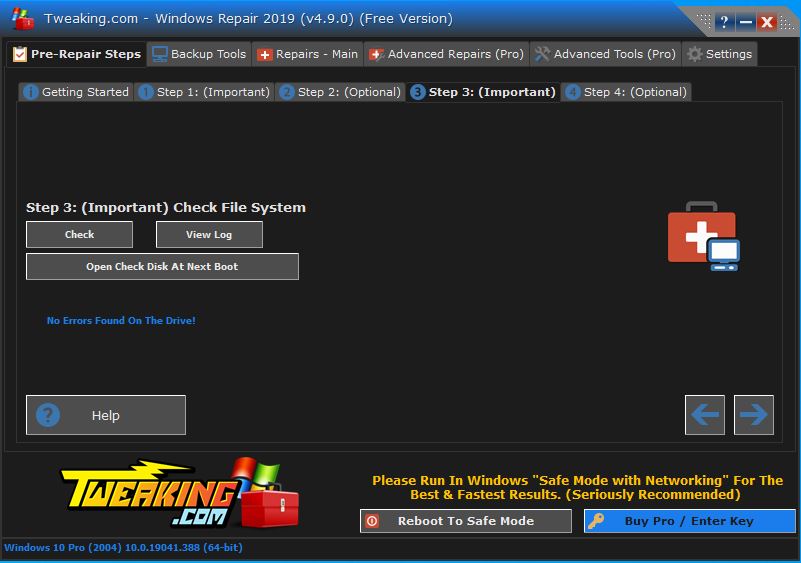
Tab: Step 3 (important)
Step 3 allows you to run a disk check, called check disk or chkdsk.
- Check : launches a read-only chkdsk
- Open Check Disk At Next Boot : equivalent
chkdsk c: /r /f.
Tab: Step 4 (optionnal)
Step 4 allows you to launch a Windows file integrity check
- Check : initiates the order
sfc /scannow

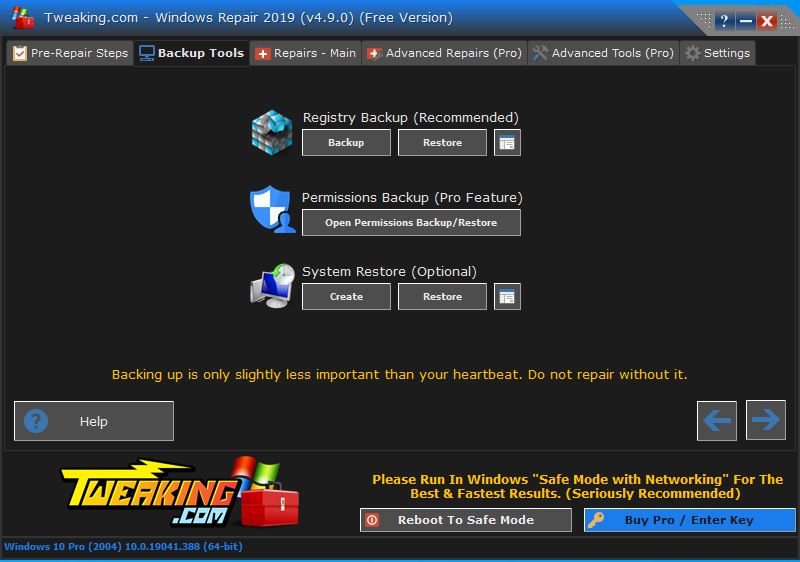
Backup Tools
On this tab, you can do several actions:
- Registry Backup (recommended): You can backup the registry (Backup) or restore it (Restore)
- Permission Backup (pro feature): you can save and restore permissions.
- System Restore (optional): Allows a single click to make a restore point (Create) and restore (Restore).
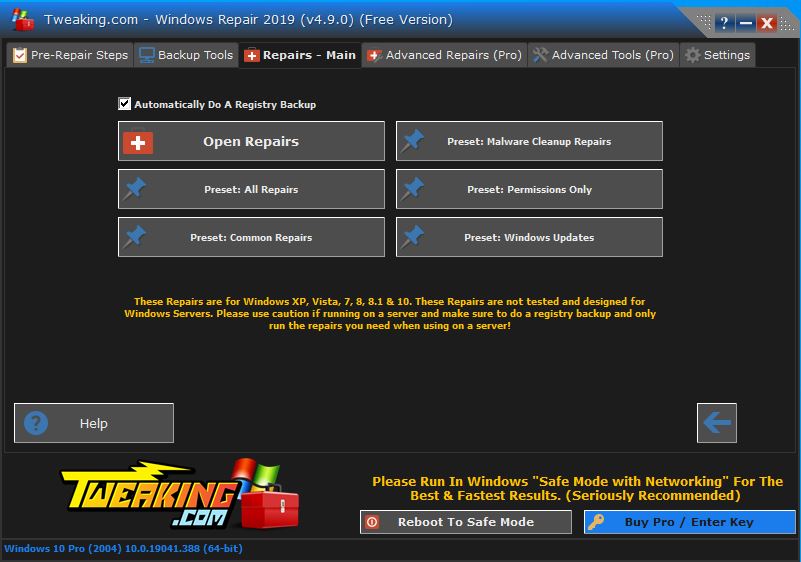
Repairs – Main
Automatically Do A Registry Backup is precotted, you can uncheck the option if you wish (strongly not recommended)
- Open Repairs : opens the list of 33 proposed repairs (listed below)
- Preset : All Repairs : all repairs
- Preset : Common Repairs : current repairs
- Preset : Malware Cleanup Repairs: launch this preset if you want to fix your Windows after malware.
- Preset : Permissions Only: permissions only
- Preset : Windows Update: use this repair if you are having Windows update problems.
List of 33 repairs
There are text files in this location C:\Program Files (x86)\Tweaking.com\Windows Repair (All in One)\repairs_info which explain the various repairs.
1 – Reset Registry Permissions
When some registry keys lose their proper permissions, many problems can occur. Like not being able to save some files, failed Windows updates, programs giving an error because they can’t access some registry key and so on.
This repair can take a lot of time, depending on the speed of your CPU and the number of registry keys.
The first part of this repair will correct missing installation dates.
If the « Installdate » registry key is missing in the uninstall section of the registry then Windows will display the « Modified » date instead, when the user opens « Add/ Remove Programs » or « Programs and Features ».
Each time this repair is performed, in addition to changing permissions, the « Modified » date will also be updated/modified.
2 – Reset File Permissions
The repair will grant administrators, system, users and all users full rights to each file on the selected drives.
This will only ADD the permissions, it will not remove the current permissions or the owner of a file.
When some files lose their proper permissions then a lot of problems can occur such as not being able to install Windows updates, program errors, faulty services and so on.
CAUTION: This repair may take a very long time to complete, depending on the speed of your CPU and the number of files on the drive.
For Windows 7, 8, 8.1 and 10
The program will set the default permissions instead of the full administration privileges that are performed on XP.
This way, the appropriate permissions are given and your machine remains safe.
3 – Reset Service Permissions
This repair will reset permissions on all services in the current system.
The authorizations are as follows:
Administrators = Full
System = Full
Trustedinstaller = Full
4 – Register System Files
This will save a list of Dll & Ocx files in the System32 & Syswow64 directories in Windows.
By saving system files, this can fix a lot of errors in Windows. Many Windows patches include saving some files to system directories.
You can edit the list to add or remove files for the record. The location of the list is system_files_reg_list.txt
5 – Repair WMI
This will repair WMI on the system. WMI is used by many Windows services and third party programs. When WMI becomes corrupted, these services and programs will fail.
Windows Firewall and also Windows Action Center are just a few examples of Windows services and programs that use WMI.
This repair may take some time depending on the speed of your CPU.
6 – Repair Windows Firewall
This will repair the Windows firewall and make it work normally again. The firewall is built in the system deep enough. And when the firewall becomes corrupt, it can still block the side connections to enter. Even when it’s off. Also, when you are corrupted, you cannot add exceptions to the firewall.
7 – Repair Internet Explorer
This will fix Internet Explorer.
When IE gets corrupted and stops working, you will notice that you just get a blank page and nothing more when you use it. Also other errors and problems. This repair tool will run IE normally again. This does not replace IE settings. It only repairs IE files.
8 – Repair MDAC_MS Jet
Any program that needs to work with a database and uses MDAC or MS Jet will fail if they are corrupted. This repair will correct MDAC and MS Jet.
9 – Repair Hosts File
This will restore the Windows host file to the default value. Some viruses and infections will add sites to the host file to prevent you from going to those sites. But some users also use the hosts file to protect themselves from bad sites.
If you run this repair tool, your current hosts file will be saved in the same directory as the hosts file, just in case you need to go back.
10 – Remove Policies Set By Infections
This will remove the policies that most infections define. Like disabling Task Manager, Windows Defender, Microsoft Security Essentials, hiding the desktop, hijacking any exe that is running and much more.
11 – Repair Start Menu Icons Removed By Infections
This repair will reverse the missing icons in the start menu, quick launch and desktop that are moved by rogue virus.
All icons are moved by virus to the temporary folder under the SMTMP folder.
Folder SMTMP
XP – C:\Documents and Settings\(Your Username)\Local Settings\Temp\SMTMP
Vista/7 – C:\Users\(Your Username)\Appdata\Local\Temp\SMTMP
Folder 1 contains all users start menu shortcuts
XP – C: \Documents and Settings\Start menu
Vista/7 – C:\Program Data\Microsoft Windows Start Menu
Folder 2 contains quick launch shortcuts
XP – C:\Documents and Settings\(Your Username)\AppData\Quick Launch of Microsoft Internet Explorer
Vista/7 – C:\Users\(Your Username)\Appdata\Roaming\Microsoft Internet Explorer\Quick Launch
Folder 3 contains the Windows 7 taskbar icons (not required)
12 – Repair Icons
If you notice that your icons on your system are just a white file, using this repair is advised. When the Windows icon database becomes corrupted, you will notice that the icons do not display properly.
This will remove the icon database from the system and allow Windows to rebuild it and fix the corrupted icons.
13 – Repair Network
This will erase the DNS cache stored in Windows. When the DNS becomes corrupted, you will not be able to access certain sites. Purging and rebuilding the DNS will solve this problem.
Also resets Winsock inputs and resets the TCP/IP stack.
This repair will also restore Winsock and Winsock2 registry keys.
These additional commands are executed on Windows Vista and later.netsh winsock > reset everythingnetsh int 6to4 > reset everythingnetsh int ipv4 > reset everythingnetsh int ipv6 > reset everythingnetsh int httpstunnel > reset everythingnetsh int isatap > reset everythingnetsh int portproxy > reset everythingnetsh int tcp > reset everythingnetsh int teredo > reset everything
14 – Remove Temp Files
It’s more maintenance than repair. The temporary record of windows can grow when it’s not emptied. There may also be files that Windows tries to use instead of the good ones. Also, some viruses and infections will be in the temp folder.
15 – Repair Proxy Settings
Many infections will define your proxy settings to prevent you from accessing websites. This repair will disable the proxy in the system.
16 – Repair Windows Updates
If Windows updates are not working then this repair can help. This will reset the Windows updates and get all the saved Windows update files.
Perform this repair if Windows updates fail and do not work properly. This repair will also restore reg service BITS keys in Vista and newer.
17 – Repair CD_DVD Missing_Not Working
This repair can help with CD or DVD drives that do not work as they should.
Errors encountered:
« The CD drive or DVD drive does not work as expected on a computer that you have upgraded to Windows Vista »
https://support.microsoft.com/kb/929461
« Your CD or DVD drive is missing or not recognized by Windows or other programs »
https://support.microsoft.com/kb/982116
18 – Repair Volume Shadow Copy Service
This repair can be useful when the Volume Shadow Copy service is not running.
19 – Repair Windows Sidebar_Gadgets
This will help to get the sidebar working again if it does not work or if some gadgets that used to work no longer work (like gadgets with just a white background).
20 – Repair MSI Windows Installer
This will try to fix the Windows Installer (MSI)
The following commands are executed:
The MSI Server service is also replaced.sc config msiserver start= demand
net stop msiservermsiexec /unregister
msiexec /regserver
regsvr32.exe /s %windir% system32 msi.dll
net start msiserver
21 – Repair Windows Snipping Tool
This will try to fix Windows Snipping tool.
This repair will only work on Vista or newer.
22 – Repair File Associations
The registry keys that are editable can be found in the program folder under « files regfiles file_associations »
You can right-click the reg file and choose to edit to see which keys are changed.
23 – Repair Windows Safe Mode
This repair will apply the registry keys needed for safe mode to boot. Some viruses remove these keys. This repair will not delete custom keys in the registry for Safe Mode. This is done to prevent breaking all the custom settings set up, just apply the default values. It also means that if a virus gets there, it will not be removed. So make sure you scan your system.
24 – Repair Print Spooler
This repair will replace the Spooler Service reg keys and perform the following commands:net stop spooler
del /F /Q %systemroot%\System32\spool\PRINTERS*
del /F /Q %systemroot%\System32\spool\SERVERS*
net start spooler
25 – Restore Important Windows Services
This will restore the services located under the files and regfiles folder.
26 – Set Windows Services To Default Startup
This repair is based on the information available at http://www.blackviper.com.
Notes :
- Cela définira le démarrage des services à l’aide de la commande « sc config ».
- Windows Repair brings the boot states back to what it assumes is necessary for Windows to work properly. This is why by default this repair allows the following services:
- 1) Windows Firewall Service called « Sharedaccess » (XP) or « Mpssvc » (Vista & newer).
- 2) Windows Defender Service called « Windefend » (Vista and later).
- 3) Windows search service called Wsearch (Vista and newer)
- But experienced users have their own favorite service settings. If the user does not like the default service status(s) (as assumed by this repair) then the user can customize the boot
- Most services are settled on one of the following three statuses:
- – « Auto » (maintenance will be performed on startup).
- – « Disabled » (service does not run on startup).
- – « Demand » (The service will be launched and executed if necessary). The user can customize the boot states using this repair. The information required for customization is provided below.
27.01 – Repair Windows 8_10 App Store
The following commands are performed.powershell -Executionpolicy Unlimited Add-Appxpackage -Disabledevelopmentmode -Register $Env:Systemroot Winstore Appxmanifest.XML
These regs sections are given to SYSTEM as owner.
HKEY_CURRENT_USER\Software\Classes\Local Settings\Software\Microsoft\Windows\CurrentVersion\AppModel\Repository\Packages
HKEY_LOCAL_MACHINE\Software\Classes\Local Settings\Software\Microsoft\Windows\CurrentVersion\AppModel\Repository\Packagespowershell -ExecutionPolicy Unrestricted Add-AppxPackage -DisableDevelopmentMode -Register $Env:SystemRoot\camera\AppxManifest.xmlpowershell -ExecutionPolicy Unrestricted Add-AppxPackage -DisableDevelopmentMode -Register $Env:SystemRoot\FileManager\AppxManifest.xmlpowershell -ExecutionPolicy Unrestricted Add-AppxPackage -DisableDevelopmentMode -Register $Env:SystemRoot\ImmersiveControlPanel\AppxManifest.xml
27.02 – Repair Windows 8_10 App Store Completely Reset App Store
This makes the commands like the « Repair Windows 8/10 App Store » but by completely resetting the app store.
You will need to re-download all the apps from the App Store once completed.
28 – Repair Windows 8_10 Component Store
The following commands are performed.Dism /Online /Cleanup-Image /Startcomponentcleanup
Dism /Online /Cleanup-Image /RestoreHealth
The first command cleans the component store (Winsxs Folder) in Windows, reducing its size and removing old entries.
The 2nd command is used to repair corrupt files and corrupt entries in the component store.
Reasons for this repair:
Used to repair Windows component storage corruption when a SFC /SCANNOW command is unable to repair corrupt system files because the store (source) is corrupted, then run the SFC command again.
Used to fix Windows Component Store corruption when the same Windows updates continue to appear to be available for installation, even if they show already installed successfully in the update history.
More information about these commands can be found here:
http://technet.microsoft.com/en-us/library/hh824869.aspx
and
http://www.eightforums.com/tutorials/26512-dism-fixing-component-store-corruption-windows-8-a.html
29 – Restore Windows 8_10 COM_Unmarshalers
Starting with Windows 8/10, the COM+ depends on a set of registry keys located under the HKEY_CLASSES_ROOT Unmarshalers system
There is a bug in Windows 8/10 where these registry keys are sometimes deleted, which when they are COM+ no longer works and a lot of things in Windows stop working, including audio, Windows Defender, Windows Firewall, WMI and many more.
When these keys are restored, COM+ works again. These registry keys do not exist in older versions of Windows and are new to Windows 8/10.
When you right-click on the desktop or in a folder, then click again and it is missing, empty or missing the default items. This repair will reset the registry keys for the new menu and its default items.
31 – Restore UAC Settings (Users Account Control)
This will restore the UAC’s default registry settings in Windows.
32 – Repair Performance Counters
This will run lodctr /r which will rebuild the Windows Performance counters from a backup file.
When the performance meters become corrupted, the displayed data becomes inoperative.
33 – Repair Recycle Bin
Corrupted recycling bins and/or items that cannot be removed from the recycle bin are fixed by this repair.
All items in the recycle bin are removed.
This repair will remove the contents from the recycle bin.
It is also capable of deleting items with more than 255 character path lengths.
PRO version
You can upgrade to the PRO version for a fee You have 3 rates:
- For 1 PC per year
- For 3 PC per year
- For a technician unlimited position number.
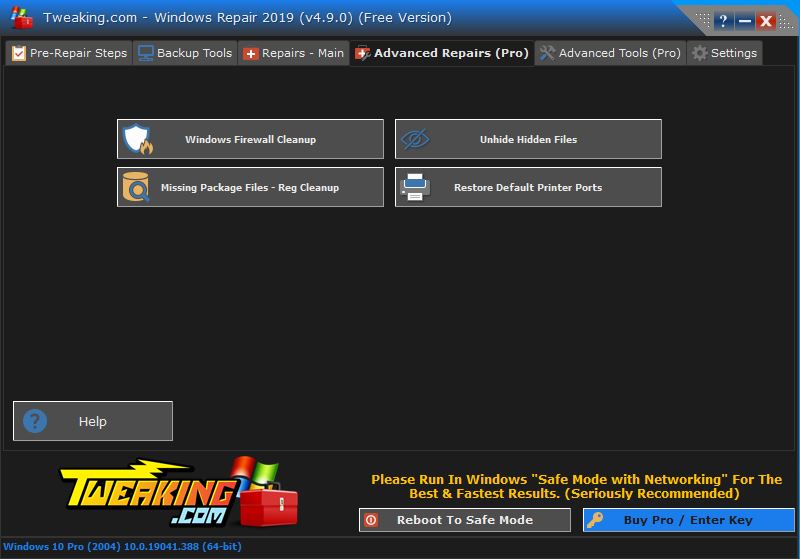
Advanced Repairs
- Windows Firewall Cleanup
- Missing Package Files – Reg Cleanup
- Unhide Hidden Files
- Restore Default Printer Ports
Advanced Tools
- Windows Quick Links
- System Tweaks (Performance)
- Edit Custom Scripts
- Enhanced Windows Disk Cleanup
- Manage Windows Users and Groups
- TrustedInstaller (Owner/Permissions)
- Run As System Account
- Windows Services (Advanced)
That’s the full overview of Windows Repair!
Thank you for reading the article to the end and do not hesitate to give me a feedback in the comments section below.
See you soon 🙂